
Infrastructure Management made easy: Define your resources in a Complaint State using CDK on a Developer Control Plane
Scroll DownManaging your infrastructure can be challenging. Things like keeping track of changes, managing your workflow commands, and version control using runbooks and scripts becomes complex very quickly. Provisioning and processing these resources gets harder and requires a lot of debugging and manual configuration, especially when you want to replicate your entire toolchain stack in a different environment for deployment and testing purposes. CDK provisions and manages your AWS stack resources in a direct and controlled way based on the code configurations you create to model your infrastructure on the Developer Control Plane.
The Developer Control Plane makes replicating your infrastructure simple. You can easily and quickly spin up a replica of your production stack and manage your resources with a few commands using the Ops CLI. From a single RDS instance all the way to a complex multi-tier application for development and testing.
Getting started is easy with our sample pre-built templates and configurations on GitHub. You can deploy and provision your infrastructure, check and update your configurations and modify your version control descriptions and versions to keep track of all the changes made to your infrastructure and application stack.
Prerequisites
- AWS CDK installed on your machine
- AWS CLI installed on your machine
- AWS Account configured with access, and secret permissions
- CTO.ai Account and CTO.ai CLI installed
- NPM & Typescript installed on your local machine
Guide
In this demo, we’ll use CTO.ai ECS-Fargate Workflow, which is open-source on GitHub, to create and set up your ECS Fargate infrastructure using CDK and automatically run Workflows.
Before you do that, you need to create your secrets in the CTO.ai dashboard. We’ll create four secrets: AWS ACCESS KEY, AWS ACCOUNT NUMBER, AWS SECRET KEY, and your GITHUB TOKEN.
- Sign up or log in to your CTO.ai Account

2. In your CTO.ai dashboard, click on Settings, select Secrets, and paste your Secret Key and Secret Values.

3. To get started with AWS CDK, download the CDK package directly on your local machine using npm install aws-cdk

- Install typescript on your system using
npm install typescript

4. Next, Initialize your CDK project on your terminal using cdk init app –language typescript. app is the name of your CDK project, and typescript is the language we are using for the project. You can use any language of your choice.
You will see that your project will synthesize and create all the dependencies for you.
- If you open your project in any code editor like VS code, you’ll see the changes, files, and folders created when you initialized your project.

You can see your:
- CDK.json file
- Jest.config.js file
- package. json file
- Library utils and dependencies, and your node modules
In your lib folder, you can see your project file. We’ll be provisioning an ECS Cluster.
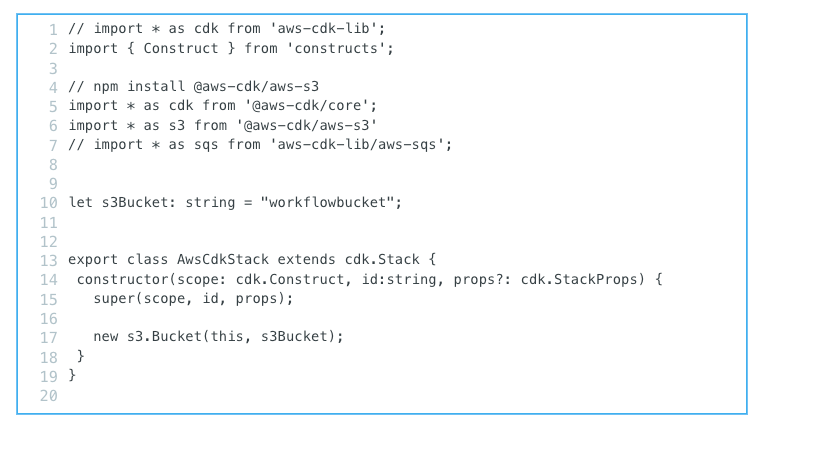
In the code above, we are creating a sample S3 bucket using AWS CDK, and the S3 bucket will be deployed to your AWS Account.
We are importing different packages in line 2-6: the aws-cdk package and the aws-s3 package. In line 10, we have the name of the bucket, the global variable. In line 13, we have the export class, creating and using the class for the cdk and the object for the cdk core created using the constructor. In line 17, we are calling the s3 package with the function new
5. Deploy your project using cdk deploy, and back in your AWS Console; you’ll see your project has been deployed successfully.

As you’ve seen, how to deploy and set up a sample ECS CDK project above. We have a fully functional ECS-Fargate CDK Workflow that lets you deploy, provision your infrastructure, and automatically set up deployment pipelines for you with a single command without worrying about the underlying infrastructure directly on a Developer Control Plane. The ECS-Fargate workflow is a PaaS workflow with GitOps / ChatOps features that supports ECS, Fargate, Aurora, SQS, Redis, and Autoscaling via CDK.
6. Clone the ECS-Fargate workflow. The ECS-Fargate workflow is open source on GitHub, and you can run it and set up the infrastructure directly on your terminal.
7. Next, set up your AWS ECS Fargate Infrastructure using aws cdk using the `ops un -b . command. This command will provision and set different resources like AWS VPC, AWS ECS, AWS Aurora, Redis, and SQS.

- Select setup an environment. The process will deploy your containers and load up your Fargate stack.
- You’ll be asked to enter the name of your environment. You can use dev as the name of your environment.

- Enter the name of the repo you want and click enter. In this guide, I'll use
sample-appas the name of my repo. You can use any repository you wish to work with and have access to.

- Your CDK Workflow will start provisioning directly on your CLI.

- In CloudFormation, you can see the changes and every stack that was created.

8. Back in your AWS Console, you can see the ECS Cluster, VPC and EC2 created for you from step 7 using a single command.

- You can also see your VPCs and subnet created automatically in your VPC dashboard.

9. Using the Developer Control Plane, you can automatically set up CI/CD pipelines on your AWS CDK workloads and resources.
- In the same directory and CLI, you deployed the infrastructure, setup, and build your pipelines using the
ops build .command.
- Select sample-app-pipeline - build a release for deployment on fargate

- When your image is built, it will create an image ID and successfully tag it in your CTO.ai registry.

- Next, publish your pipeline using the
ops publish .command. The process will start creating your pipeline and eventually deploy it to the Developer Control Plane.

10. On the Developer Control Plane, Click on Pipelines, and you’ll see the Pipeline you deployed.

- You can also click on your sample-app-pipeline to see more details about it. You will see an overview of all the last pipelines that have been triggered, the date and time it was run, RUN ID, VERSION tag, and the STATUS.

- When you click on it, you’ll see your Pipeline logs and deployment commands that were automatically set up for you when you published your pipelines to your team in step 9. On the Developer Control Plane, you can easily debug CI/CD issues, know when to investigate specific deployments from the logs, and set up complete automation on your CDK resources.

Summary
You can see how straightforward it is to define and provision many resources with the Developer Control Plane. The Developer Control Plane bridges the gap between DevOps Engineers and Developers by allowing them to release new features rapidly and handle the complexity of updating and deploying your infrastructure.
The Developer Control Plane enables you to interact, deploy and automate your CDK applications and enables extra functionality such as showing the differences between the running stack and proposed changes in each environment (Dev, Stg and Prod), orchestrating a CDK workflow, setting up automated builds on each CDK workflow, confirming security changes before deployments, and deploying multiple CDK stacks across multiple environments.
What if I don't have an existing AWS CDK project?
Been there! Here's a starter project for you to get going:
Setup and Deploy the ECS Fargate Workflow
Comments