
Running Applications with State
A Kubernetes volume is a directory that contains data accessible to containers in a given Pod in the orchestration and scheduling platform. Volumes provide a plug-in mechanism to connect ephemeral containers with persistent data stores elsewhere.
Kubernetes volume is a separate object defined within the content of your Kubernetes pod. The volume is associated with your Kubernetes pod but mounted into a container at a particular path. In Kubernetes, there are different volume implementations and usecases like Empty Dir; the temporary volume associated with your Pod. The duration and lifespan of your volume is connected with your Pod and the Directory in your Kubernetes resource path.
Also, you can have cloud-mounted directories that are persistent across the lifespan of your pods and even multiple clusters. A Persistent Volume is another resource type within Kubernetes and it can be connected and linked to your Azure Disk, AWS EBS storage. These disks live longer than the lifespan of the pod. When your pod is removed or deleted, your disks will follow your pod around.
Kubernetes supports many types of volumes. A Pod can use any number of volume types simultaneously. Ephemeral volume types have a lifetime of a pod, but persistent volumes exist beyond the lifetime of a pod. When a pod ceases to exist, Kubernetes destroys ephemeral volumes; however, Kubernetes does not destroy persistent volumes. For any kind of volume in a given pod, data is preserved across container restarts.
At its core, a volume is a directory, possibly with some data in it, which is accessible to the containers in a pod. How that directory comes to be, the medium that backs it, and the contents of it are determined by the particular volume type used.
Volumes in Kubernetes allow you to store data outside the container. When the container stops, all the data on the container itself is lost. Stateless applications are applications that don’t keep a local state but store their state in an external service. The external service can be a database, caching server (MySQL, AWS, S3). You can use external services without using volumes. Persistent volumes in Kubernetes allow you to attach a volume to a container that will exist even when the container stops. When the container stops, your pod stops but your volume can be reattached to a new container and you can keep the state of your application. This process lets you keep the files that are necessary for your application to run. Volumes can be attached using different volume plugins.
In this diagram below, we have our Node with some pods on and the containers in the pods can be used to attach our volume. If Kubernetes Pod 1 has a local data attached to it, that volume can be saved on Kubernetes Node 1 and be attached to another pod on the same node.
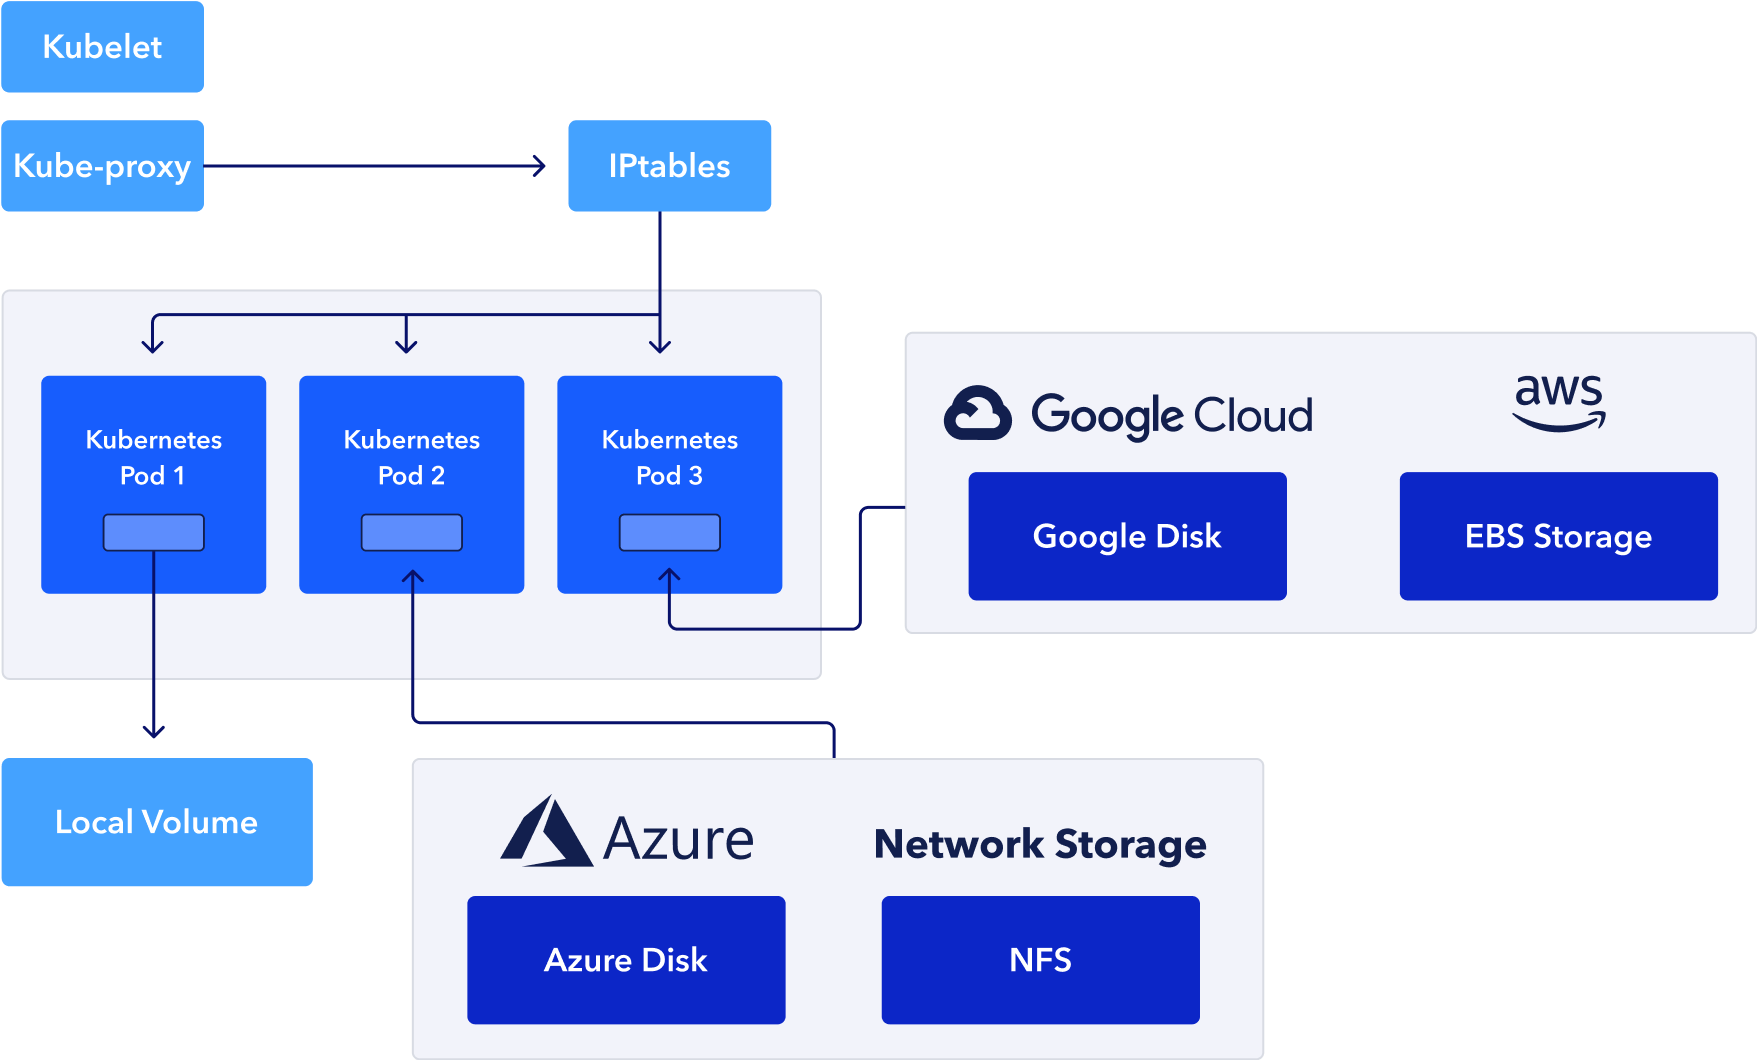
If you are running on external services you can use AWS EBS storage. You can attach your EBS to any node in the same availability zone your EBS is located. On Google Cloud, you can use Google Disk, and if you are running on Microsoft Azure, you can use Azure Disk.
By using Volumes, you can deploy applications with the state on your Cluster. Those applications need to read and write to files on your local filesystem. In Kubernetes Volumes, if your node stops working, your pod can be rescheduled on another node, and the volume can be attached to the new node.
In this tutorial, we will explore how we can run these services inside our Kubernetes cluster and use volumes for the stateful applications.
Let’s dive in
Before you get started, create an EKS cluster using our previous tutorial as we will be using AWS EKS for this tutorial.
- To use volumes, you need to create a volume on an external service like AWS. In this tutorial, I will be using AWS Volumes. Here, I’m creating a volume that is 10 gigabytes in the us-west-1 region and SSD volume general purpose 2.
I will be creating my volume using the AWS CLI. Paste this command in your CLI, wait for some minutes for your volume.
aws ec2 create-volume --size 10 --region us-west-1 --availability-zone us-west-1a --volume-type gp2 --tag-specifications 'ResourceType=volume, Tags=[{Key='Kubernetes',Value='volumekey'}]'
- You can visit your AWS console to check if your volume is available.

2. To use volumes, you need to create a pod with a volume definition. We can specify the volumeMounts , the “mountPath” can be <the name of your volume>
apiVersion: apps/v1
kind: Deployment
metadata:
 name: kubernetes-deployment
spec:
 replicas: 1
 selector:
   matchLabels:
     app: express-App
 template:
   metadata:
     labels:
       app: exoress-App
   spec:
     containers:
     - name: express-app
       image:  tolatemitope/express-app
       ports:
       - name: nodejs-port
         containerPort: 5000
       volumeMounts:
       - mountPath: /myvol
         name: myvolume
     volumes:
     - name: myvolume
       awsElasticBlockStore:
         volumeID: # Volume-ID created on AWS
3. In your volume deployment configuration file, paste your volume ID.
apiVersion: apps/v1
kind: Deployment
metadata:
 name: kubernetes-deployment
spec:
 replicas: 1
 selector:
   matchLabels:
     app: express-App
 template:
   metadata:
     labels:
       app: exoress-App
   spec:
     containers:
     - name: express-app
       image:  tolatemitope/express-app
       ports:
       - name: nodejs-port
         containerPort: 5000
       volumeMounts:
       - mountPath: /myvol
         name: myvolume
     volumes:
     - name: myvolume
       awsElasticBlockStore:
         volumeID: vol-0ce33307daa915e75
4. Next, confirm if you can see your EKS Nodes.

5. Next, create your volume deployment using kubectl create -f <name_of_configuration>

6. Get your pods on terminal using kubetl get pods

7. Get an overview of your pod using kubectl describe pod kubernetes-deployment-6cb5446cf6-8lq8r Here, you will see your Volumes, Conditions, events, and annotations. You can see that it’s a persistent disk resource in AWS.

8. Next, exec into your pod using kubectl exec --stdin --tty kubernetes-deployment-6cb5446cf6-8lq8r -- /bin/sh
Where kubernetes-deployment-6cb5446cf6-8lq8r is the name of your pod.
- Get the file path of your volume using
ls -ahl /myvol/

9. Next, let’s create files inside our Pod.

10. You can create more files and get the file path of the files.

11. If one of your nodes crashes, your pod will be rescheduled. Let’s drain a node to test it using kubectl drain ip-192-168-8-31.us-west-1.compute.internal --ignore-daemonsets --delete-emptydir-data

12. Get your pods using kubectl, you will see that the new pod has already been created and pending.

13. Next, Exec into your new pod. You will see your file in your /myvol/ path but you won’t be able to see the other file because this is a new pod and we didn’t attach it in the /myvol/ path . volume.txt wasn’t saved in the volume but the container itself so when your pod gets rescheduled all the information that has been written to the container disappears.
When you have a Stateful application that needs to write your data, you always need to use volumes because your data will be kept even when the Node crashes or if it is rescheduled.
14. When you are done, you can delete your volume using aws ec2 delete-volume –volume-id <volume_id>

Looking for a Developer Control Plane for your Nodes and Kubernetes Workloads?
Now that you’ve understood how to set up and scale your pods using Kubernetes Replication Controller, check out how you can leverage the CTO.ai developer control plane to deliver your Kubernetes replica set and Docker images with an intuitive PaaS-like CI/CD workflow that will enable even the most junior developer on your team to deliver on DevOps promises.

Comments