
The modern software development landscape relies on seamless collaboration, automation, and efficient workflows. CTO.ai is an outstanding platform that allows developers to build, share, and run workflows to optimize and simplify the development process. Today, we will discuss leveraging the CTO.ai JavaScript SDK to create effective workflows for your team.
Introducing the CTO.ai JavaScript SDK
CTO.ai provides a JavaScript SDK that allows developers to create and manage their custom workflows using JavaScript. The SDK makes it easy to create workflows, including support for user input, output formatting, and getting insights into your workflow created through the SDKs.
Getting Started with CTO.ai JavaScript SDK
Install the CTO.ai CLI
To start, you'll need to install the CTO.ai CLI. The CLI is available for macOS, Linux, and Windows. You can install it using the following command:
npm install -g @cto.ai/ops
- Next, initialize your workflow using the
ops initcommand. Theops initcommand in the CTO.ai Ops CLI is used for initializing a new Ops project. It sets up the required files and directories for your new Ops project, including configuration and source code files. - Select the command workflow.

- Click on the JavaScript template to use in your workflow. The javascript template lets you create reusable configs and insert dynamic parameters or variables into your application.

- Your directory creates five files for you:
.dockerignore,Dockerfile,index.js,ops.yml, andpackage.jsonfiles.
const prompt_res = await ux.prompt({
  type: 'input',
  name: 'repo',
  message: 'Which application do you want to deploy?',
});
In the index.js file the code uses the ux.prompt() function to ask the user for the application name they want to deploy. The user's input is then stored in the prompt_res variable.
After that, we’ll use the sdk.exec() function to execute a shell command (`ls -asl`) and store the output in the stdout variable. Then, it logs the output using the sdk.log() function.
const { stdout } = await sdk.exec('ls -asl');
sdk.log(stdout);
When we're done storing the prompt_res variable, use the sdk.exec() function to execute a shell command (`ls-asl`) and store the output in the stdout variable. Then, it logs the output using the `sdk.log()` function.
sdk.log('Here is how you can send logs');
await ux.print(
  `🚀 ${prompt_res.repo}'s successful deployment has been recorded!`
);
In our sample application, we’ll log a custom message and print a success message to the user, indicating the successful deployment of the specified application. If your application deployment didn’t build, the log message would be a failure.
const event = {
  event_name: 'deployment',
  event_action: 'succeeded',
  branch: 'main',
  repo: prompt_res.repo,
};
sdk.track([], event);
Specify your event_name, event_action, and the branch in your event object with relevant information about the deployment and uses the sdk.track() function to track this event.
main().catch(err => {
  sdk.log(err);
  process.exit(1);
});
This section of the code executes the main function and, if an error occurs, logs the error and exits the process with an error code.
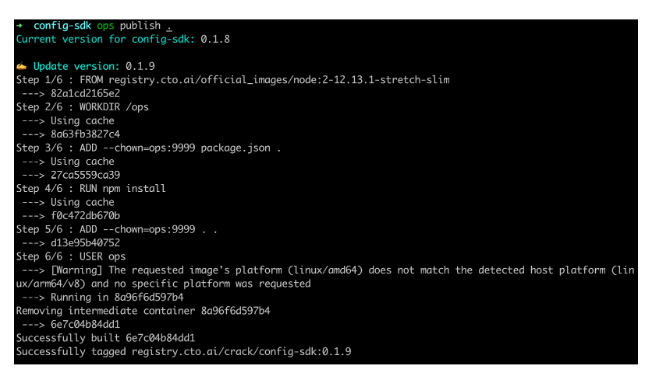
In the Dockerfile, we’re specifying the base image the Docker container will be built on using the Node.js 12.13.1 image pulled from the CTO.ai container registry.
WORKDIR /ops This command sets the working directory within the container to ops. All other subsequent commands are executed within this directory.
ADD –chown=ops:9999 bbpackage.json. this command adds the local package.json file (which contains the dependencies for a Node.js application) to the /ops directory in the container, and sets the owner and group owner of the file to the ops user with UID 9999.
USER ops:This command ensures that the container runs as a non-root user, in this case, the ops user. This helps to minimize potential security risks by limiting the container's privileges.
Run and Build your Application Workflow
Build your application workflow using the ops run -b config-sdk command. With this command, you can integrate and build your application and compile the code based on the instructions defined in your application directory.

- Next, in your terminal, it’ll ask you about the application you want to deploy, which is the
config-sdkwe initialized earlier.

- Next, publish your application workflow using the
ops publish .command. This command will publish your newly created workflow to the CTO.ai registry, making it available for yourself and others.
- When you switch your
event_actionfrom succeeded to failed, you’ll see the deployment status log in your insights dashboard.
const event = {
  event_name: 'deployment',
  event_action: 'succeeded',
  branch: 'main',
  repo: prompt_res.repo,
};
sdk.track([], event);
View Application Events in CTO.ai
In your CTO.ai dashboard, you can view your workflow Commands from your config-sdk.
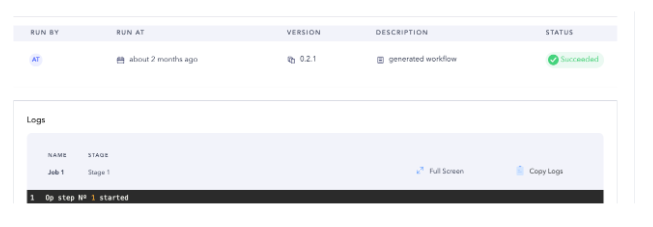
In your insights dashboard, you can see your workflow events with the event metrics.
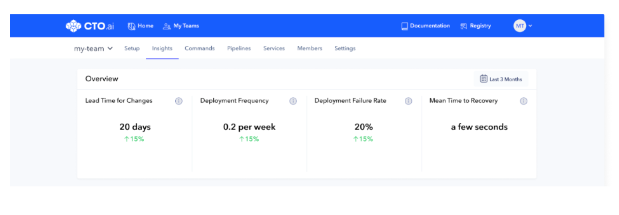
In your deployment status, you can see the successful and failed events.

Workflow events are specific points or conditions within your application deployment that can trigger the execution of tasks or jobs. With CTO.ai workflows, you can reduce manual intervention and the potential for human error, ultimately saving time and resources.
Unlock the Full Potential of Your Workflows with CTO.ai JavaScript SDK
Don't let manual tasks and inefficiencies hold your team back. Leverage the power of CTO.ai JavaScript SDK to streamline and automate your workflows, enhancing collaboration, productivity, and customer satisfaction. Get started with CTO.ai JavaScript SDK today and unlock the full potential of your business processes!
Comments